

Introduction: Blooms: Phi-Based Strobe Animated Sculptures


This instructable demonstrates and explains blooms, a unique type of sculpture I invented that animates when spun while lit by a strobe light (or captured by a video camera with a very fast shutter speed).
Unlike a traditional 3D zoetrope, which is essentially a flip book of multiple objects, a bloom is a single coherent sculpture whose ability to be animated is intrinsic to its geometry.
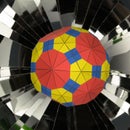
What you are viewing in each of the above videos is a bloom spinning at 550 RPMs while being videotaped at 24 frames-per-second with a very fast shutter speed (1/4000 sec). The rotation speed is carefully synchronized to the camera's frame rate so that one frame of video is captured every time the bloom turns ~137.5º—the golden angle. Each petal on the bloom is placed at a unique distance from the top-center of the form. If you follow what appears to be a single petal as it works its way out and down the bloom, what you are actually seeing is all the petals on the bloom in the order of their respective distances from the top-center. Read on to learn more about how these blooms were made, why the golden angle is such an important angle, and how these are related to the Fibonacci numbers. You will also find some tips for constructing the turntable and strobe light required to animate blooms.
You can obtain a 3D print of a bloom at Shapeways.com
Step 1: How the Blooms Were Designed to Create This Effect

The placement of the appendages on blooms is critical to the success of the animation effect. The positions are based on a specific phyllotaxy (i.e. leaf order) used by nature in a number of botanical forms, including pinecones, pineapples, sunflowers, artichokes, palm trees, and many succulents.
The photo above shows just such a succulent. I have numbered the leaves from youngest to oldest. If you follow the numbers in sequence you will find that each leaf is approximately 137.5º around the core from the previous leaf. 137.5º is a very special angle, called the golden angle, based on the golden ratio. The golden ratio is such an important number in mathematics that it's been assigned to the greek letter Φ (phi). When the golden angle is used by nature as a growth strategy it leads to the formation of spiral patterns. If you were to count the number of spirals in these patterns you will find that they are always Fibonacci numbers (e.g. check out the spirals on these pinecones).
In designing the blooms, I used essentially the same method employed by nature. I placed the appendages one-at-a-time starting from the top-center, positioning each appendage 137.5º around the center from the previous appendage and also a little further out and/or down.
So when I animate these blooms by spinning them with a strobe light (or video camera) I am, in a sense, recreating the process that I used to make them in the first place. Below are two stop-motion animations of some of my earlier work with Fibonacci spirals. You may these helpful in gaining a better intuition about how this animation technique operates.
The first animation shows a self-similar tiling, in which every piece is a unique size, but all pieces are the same shape. In the video each piece is removed (and later added) at an angle of ~137.5 degrees from the previous. Note: this is not CGI (computer-generated imagery); it is a stop-motion animation of actual laser-cut pieces of MDF.
(BTW, if you would like to make one of these Fibonacci tilings for yourself, check out my instructable, which includes the cutting file.)
The second animation shows the TransTower, a sculpture based on the same geometry as the tiling above. The transformations in this tower result entirely from rotating the individual layers by the golden angle with respect to their neighboring layers. (Note: this is not CGI; it is a stop-motion animation of actual laser-cut MDF.)
Step 2: How the Blooms Were Made


These blooms were modeled using Python scripting for Rhino on a Mac. Once the modeling was completed in Rhino, they were exported as STL files, and then printed using a Zprinter 450.
The annotated images above walk through the modeling process.
Step 3: Natural Blooms
In reading the previous descriptions, you might have asked yourself "Since blooms are based on natural plant forms, could the plant forms themselves be animated in the same manner?" The answer is "Yes, if they are sufficiently symmetrical." Below is an example of an artichoke being spun on a lathe. Because this artichoke is not completely symmetrical, the animation is rather wobbly, but you should still be able to see the leaves appearing to grow up and down the form.
And here is an animated cactus. Rather than putting it in a lathe (which seemed inadvisable, given all those spines) I use stop-motion animation, rotating it 137.5º between successive frames.
I'm on the lookout for other highly symmetrical Fibonacci-based botanical forms to animate. Stay tuned...
Step 4: Tips for Animating the Blooms
Choosing the Strobe Rate
The videos shown at the beginning of the of this instructable were shot with a video camera running at 24 frames/second. If you animate a bloom using a strobe running at 24 flashes/second, you will find that the sense of flashing is quite pronounced, and detracts from the effectiveness of the animation. I suggest running the strobe at a minimum of 33 flashes/second to get a satisfyingly coherent illusion. Keep in mind that this will also mean spinning the turntable faster in order to maintain the strobe and turntable in synch. At 33 flashes/second, your turntable will need to be spinning 756 RPM (or 12.6 revs/sec).
An Inconvenient Truth
Now I have a confession to make. In order not to confuse the casual reader, I told a little white lie at the beginning of this instructable, when describing what was going on in the videos. The vast majority of people reading the introduction to this instructable will never try to recreate the effect, and thus will not be impacted by the slight inaccuracy of my description. But you, having read this far, are far more likely to be actually trying to animate a bloom. I certainly do not want to create unnecessary confusion for you in your pursuit, so, I am now going to give you the unvarnished truth.
To refresh your memory, here is what I wrote in the introduction:
What you are viewing in each of the above videos is a bloom spinning at 550 RPMs while being videotaped at 24 frames-per-second with a very fast shutter speed (1/4000 sec). The rotation speed is carefully synchronized to the camera's frame rate so that one frame of video is captured every time the bloom turns ~137.5º—the golden angle...If you follow what appears to be a single petal as it works its way out and down the bloom, what you are actually seeing is all the petals on the bloom in the order of their respective distances from the top-center.
And now, here is a version with the white lies removed:
What you are viewing in each of the above videos is a bloom spinning at 340 RPMs while being videotaped at 24 frames-per-second with a very fast shutter speed (1/4000 sec). The rotation speed is carefully synchronized to the camera's frame rate so that one frame of video is captured every time the bloom turns ~85º—not the golden angle...If you follow what appears to be a single petal as it works its way out and down the bloom, what you are actually seeing is every second petal on the bloom in the order of their respective distances from the top-center.
"Huh???"
Ok, let's see what's going on here. The reason for the slightly more complicated story (and thus the white lie) is that even at a very fast shutter speed, the video camera we used (a Canon EOS 5D Mark III) does not record every pixel of the image at exactly the same moment, and this results in distortions in the image. If you look carefully at the videos you can see evidence of this distortion in certain parts of the image. When we tried to record the bloom spinning at the speed required to achieve 137.5º rotation every frame, the distortion became very pronounced, so we slowed things and spun it at ~61.8% of the "proper" speed (550/340 = .618--golden ratio, anyone?).
Why this particular speed, you ask? Well, if running it at the "proper" speed causes the camera to capture every petal of the bloom in sequential order, the next slower speed we could run it at while still achieving a consistent animation would be one that led to the camera capturing every second petal in sequential order. We know that it takes a rotation of 137.5º to get from any given petal to the next one in the sequence, so to skip a petal we need to rotate 2 * 137.5º, or 275º. Now, that may initially seem counterproductive, since we've doubled amount we have to rotate for each frame. But because we're dealing with a circle, 275º is the same as -85º. So if we just reverse the direction the turntable is spinning, we can slow it down to 85º per frame and get an animation that moves twice as fast, because it only sequences half as many petals.
(It's interesting to note the rather counter-intuitive fact that by slowing down the turntable to 61.8%, we double the speed of the animation.)
Of course, capturing every second petal is not the only speed change we can achieve. We could also choose to capture every third, every fourth, every fifth petal, and so on. Let's look at how much we'd need to rotate the turntable for the first eight of these:
A few observations from the chart above:
1) As the frequency increases, those that are Fibonacci numbers always lead to a smaller resulting angle.
2) The sign of the resulting angle for the Fibonacci numbers alternates between positive and negative.
3) The % of full speed for subsequent Fibonacci numbers decreases by the golden ratio.
The chart above only shows the first eight frequencies, with the Fibonacci frequencies in bold. I encourage you to continue the process for higher frequencies to convince yourself that the above observations remain true for all values.
Finally, I'd like to note that in actual practice I run the strobe at a higher frequency than 24fps. Because the light is on for such a tiny part of each cycle, it looks quite "flashy" at that rate. So instead I run it at 36fps (50% faster) and rotate the turntable at 825rpm, which yields a more constant-appearing illumination.
Step 5: Technical and Sourcing Info for Creating a Bloom Animator

Blooms
You can obtain a 3D print of a bloom at Shapeways, a 3D printing service.
Turntable
For a quick-and-dirty prototype, you can try using a power drill, which is what I did (see annotated photo above). I controlled the speed by attaching a C-clamp to the trigger. It's noisy and difficult to control, but it can get you started.
Ultimately, you'll want a reasonably quiet and fully controllable turntable. I made mine using this brushless motor for R/C helicopters, this ESC (Electronic Speed Controller), and this servo tester to adjust the speed. I powered it with this 12V 5A DC power supply. It was a rather expensive setup, but was the only solution I could find that had enough torque to drive the turntable directly. By driving the turntable directly from the motor, I was able to avoid the complexity of constructing a gear or belt mechanisms. Eventually, I replaced the servo tester with an Arduino Uno, which gave me finer control of the rotational speed.
Note: the ESC I mentioned above, works fine, but also caused the motor to emit a rather unpleasant high-pitched squealing sound. To avoid that, you can use this ESC instead, but because this particular ESC doesn't provide 5V BEC, you will have to supply the servo tester with external power. (If anyone locates an ESC that avoids the squealing while still providing the 5V BEC, please let me know and I'll post it here.)
I constructed the turntable using laser-cut 1/4" acrylic, with laser-cut screw holes aligned to those on the motor. To hold a sculpture in place, I laser-cut a 1/8" acrylic disk to fit snugly inside the base ring of the sculpture. The disk and the turntable have two aligned laser cut screw holes into which I placed screws to hold the disk in place. This arrangement makes it relatively easy to change out different sized disks for different sized sculptures, but if things are not perfectly centered and balanced, the sculpture will vibrate, which will make the animation look shaky, and potentially cause the sculpture to become dislodged from its moorings. Because of the high velocities involved, it is essential that everything be perfectly centered. The accuracy of the laser cutter make that feasible, but even laser cutters are not quite perfect, so you may still run into some slight, but potentially significant asymmetry issues (I did). You may need to use very thin shims in various places to get things sufficiently centered.
Strobe Light
The Strobe light must be capable of at least 30 flashes-per-second (1,800 flashes-per-minute). Inexpensive party strobes are not able to do this. Monarch Instruments makes a number of strobe lights, this being the the least expensive model. If you are aware of a less expensive source for a similar strobe light, please let me know.
You can also make your own LED strobe light, controlled by an Arduino board. Note that it's not enough to simply have the light flashing at 30fps, with the on-times and off-times being equal in length; the on-times must be no more than 0.5% of the off-time in order to properly freeze the spinning sculpture. This means that the apparent brightness of the light will be only 0.5% (1/200th) of what it actually is. So the LED has to be very powerful. I used this 100W LED and this reflector and it is bright enough (especially when over-driven by a factor of 2-5, which can be done without harming the LED since it is on for such a brief periods). Since the strobe is on for a very small percentage of the time, you don't need a very big power supply to run it as long as you add a capacitor to store up the energy between flashes and then deliver the necessary current for the brief flashes.
Step 6: Acknowlegements
The videos of the blooms and artichokes were shot by Charlie Nordstrom, Pier 9 Artist-in-Residence Digital Storyteller.
This work would not have been possible without the generous support of Instructables.com, where I was fortunate enough to be an Artist-in-Residence during the summer of 2014. I am very grateful to have had access to their state-of-the-art fabrication facility, and for the invaluable assistance I received from the remarkable Instructables staff and Artists-in-Residence.


